0
£0.00
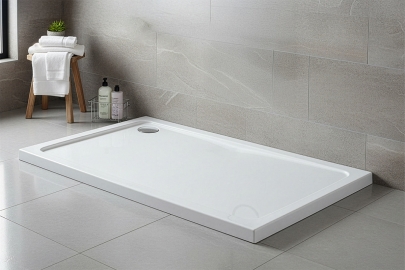
Fitting a shower tray isn't the most glamorous DIY job, but get it right and you've sorted the foundation for your entire shower setup. Mess it up on the other hand, and you're looking at leaks, wobbly bases, and potentially a lot of water damage down the line.
The good news is, it's pretty straightforward if you've got basic DIY skills and a bit of patience. Here's how to do it properly.
First step: gather your tools. You'll want a spirit level, an adjustable spanner, some silicone sealant and a gun, a tape measure, and a pencil. Depending on your tray type, you might also need mortar or a leg and panel system.
Most modern trays come with their own waste and trap, but double-check yours does before you rip out the old one. Nothing worse than getting halfway through the job and realising you need to make an emergency trip to the plumbing merchant.
If you're working with a stone resin tray, you'll probably want some help lifting it. They're deceptively heavy - a standard 900mm square tray can weigh 20-30kg, and larger ones significantly more.
Now before you get started with fitting anything, you need to make sure that your floor is solid, level, and capable of supporting the tray's weight - plus you standing in it, obviously.
If you've got wooden floorboards, they need to be in good condition. Any rot or serious flex and you'll need to sort that first - the last thing you want is a shower tray sitting on dodgy boards that'll sag over time.
Concrete floors are easier, though they still need to be reasonably level. A slight slope for drainage is fine, but anything more than a few millimetres and you're making life harder than it needs to be. You can use self-levelling compound to sort out minor irregularities if needed.
You should also check for any existing damp issues; if there's moisture coming up through the floor, you need to address that before installing anything new. Otherwise you're just trapping the problem underneath your lovely new shower.
Don't commit to anything permanent yet. Place the tray where it's going to live and check the fit. Does it sit flush against the walls? Is there enough space for the waste pipe?
This is when you'll spot any issues - maybe the tray's slightly too big, or the waste outlet doesn't quite line up with your plumbing. Better to know now than when you've already sealed everything in place.
Connect the waste trap loosely just to make sure it all reaches. You want about 50mm clearance underneath for the trap, though some low-profile options need less. Measure twice, cut once, as they say.
Here's where it gets a bit fiddly. Your tray needs to sit at the right height for the waste pipe to connect and have enough fall for proper drainage.
If you're using legs (most acrylic trays come with adjustable ones), wind them to roughly the right height. For stone resin trays, you're typically bedding them on mortar or using a frame system. Each manufacturer has slightly different recommendations, so check the instructions.
The waste needs a slight fall towards the drain - usually about 1:40 gradient - so the water doesn't just sit there. Your plumber will have thoughts on this if you've got one helping out. If you're solo, just make sure the pipe slopes downward from the trap to wherever it's connecting.
Get your spirit level out and check in multiple directions. Front to back, side to side, corner to corner. The tray needs to be dead level, otherwise water pools in corners and you end up with standing water that never quite drains.
This is where people often rush things, but it's imperative that you don't. A tray that's even slightly off-level will annoy you every single time you use the shower.
Those adjustable legs are brilliant for fine-tuning. Keep checking and adjusting until it's spot on. This bit takes longer than you'd think, but it's worth being patient. Some installers spend 20-30 minutes just getting the level perfect.
If you're using mortar, you can adjust the level as you go by adding or removing mortar in specific spots. Work methodically and keep checking with your spirit level.
How you secure it depends on what type you've got.
Acrylic trays usually sit on adjustable legs with a frame. Once you're happy with the level, tighten everything up. Some people add a bead of silicone where the feet meet the floor for extra stability, which isn't a bad idea if the floor's not perfectly smooth.
Stone resin trays often get bedded on mortar. Mix up your mortar (not too wet - you want a fairly stiff consistency), apply it in strips where the tray will sit, then carefully lower the tray into position. You've got a bit of working time to adjust the level before it sets, but don't take forever about it.
Some installers prefer to use a continuous bed of mortar under the entire tray for maximum support. This is particularly important for larger trays or if multiple people will be using the shower regularly.
With the tray in position, properly connect your waste and trap. This is the bit that absolutely cannot leak, so take your time.
Most traps come with rubber washers - make sure they're seated properly and haven't twisted as you tighten things up. Hand-tight is usually enough; you don't need to wrench everything down like you're building a submarine. Over-tightening can actually crack acrylic trays or damage the threads.
Modern fast-flow wastes are pretty good, but make sure you've got the right type for your tray. Some trays have specific waste requirements, particularly the really slim ones.
Test for leaks by running water before you seal anything permanently. Just let it run for a few minutes and check underneath with a torch. If you spot any drips, now's the time to sort them. Better to discover a leak before you've tiled everything in.
Once you're confident there are no leaks, seal where the tray meets the walls. Use a good quality bathroom silicone - the cheap stuff goes mouldy fast and you'll be redoing it within a year.
Run a neat bead along each edge, then smooth it with a wet finger or a proper sealant tool. Some people use masking tape to get a really crisp line, which works well if you're a bit of a perfectionist.
The key to a good silicone seal is getting it done in one smooth motion. Start in a corner and work your way along without stopping. Any hesitation and you'll end up with lumps and gaps.
Leave it to cure properly before using the shower. Most silicones need at least 24 hours, though some fast-cure versions claim less. Check the tube for specific times.
Before you crack on with tiling or fitting your enclosure, give everything one last check.
Run the shower properly - like a proper five-minute shower, not just a quick rinse. Check for leaks underneath, make sure the water's draining properly, and confirm the tray feels solid underfoot. Any flex or movement at this stage means something's not right.
If you followed our shower tray buying guide, you'll have picked something that suits your bathroom layout. And now that it's fitted properly, you're halfway to a cracking new shower setup!
Here are the main pitfalls that catch people out when fitting shower trays:
And whatever you do, don't tile or fit your enclosure before testing for leaks. You need access underneath until you're absolutely certain everything's watertight.
Ready to upgrade your shower? Here at Heat and Plub, you'll find over 30,000 bathroom products from well-known brands, alongside our exclusive ranges like Delphi, Signature, and Verona.
We offer free delivery to most of the UK on orders of any value, which makes a real difference when you're budgeting for a bathroom renovation. Our pricing on branded products is often more competitive than larger retailers - we've spent 20 years building relationships with suppliers and we pass those savings on.
Got questions about choosing the right tray for your specific setup? Our technical sales team can help you work out exactly what you need. We're not just order-takers - we've got knowledgeable staff who understand the technical side of bathrooms and heating. Give us a call and we'll talk you through it properly. Or if you prefer, simply browse our fittings suited for different bathroom layouts online and give your bathroom the makeover it deserves.

If you're reasonably handy with DIY, you can fit a shower tray yourself. The trickiest bit is getting the level right and ensuring the waste connections don't leak. If you're not confident with plumbing or your floor needs significant prep work, it's worth getting a professional in. A plumber can usually fit a tray in a few hours.
For an experienced DIYer, fitting a shower tray takes about 3-4 hours including prep work and testing. If it's your first time, allow a full day. This includes removing any old tray, prepping the floor, fitting and levelling the new tray, connecting the waste, and sealing. Don't forget you'll need to wait 24 hours for sealant to cure before using it.
It depends on the tray type. Stone resin trays are typically bedded on mortar for full support. Acrylic trays usually come with adjustable legs and don't need mortar, though some installers add a sand and cement mix underneath for extra stability. Check your manufacturer's installation instructions - they'll specify what's required for your particular tray.
An unlevel shower tray will cause water to pool in the corners rather than draining properly. This leads to standing water, which encourages mould growth and looks messy. Over time, it can also cause leaks as water finds its way through seals that aren't designed to hold pooled water. Always take the time to get your tray perfectly level.
You shouldn't tile directly onto the tray itself. Your tiles should come down the wall to just above the tray, with a silicone seal between the tiles and tray edge. This seal needs to be flexible because the tray will move slightly when you stand on it. A rigid tile joint would crack. Leave a small gap (2-3mm) and seal it properly.
Measure your shower space carefully - width, depth, and the available height for the tray and waste. Remember to account for wall thickness if you're tiling. Standard sizes are 760mm, 800mm, 900mm, 1000mm, and 1200mm square or rectangular. For awkward spaces, you can get quadrant trays that fit into corners, or offset shapes. Just make sure your chosen tray will physically fit through your bathroom door!

Learn how to measure for a bath screen, including width, height, swing space, bath shape, tap position and the key checks before buying.
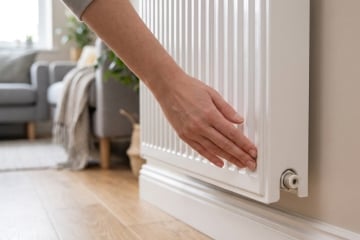
When a customer tells me their radiator is hot at the top but freezing at the bottom, the diagnosis is usually straightforward: the hot water isn't circulating through the lower channels. In the vast majority of UK central heating systems, this points to a build-up of debris restricting the flow where it naturally settles. Let's look at exactly what is going on and how to sort it out before you spend money on a replacement.

A weak shower is often caused by a mismatched shower head, built-up limescale, restrictive pipework, a poorly specified water system or an incompatible pump. Pinpointing the root of the problem saves money and helps avoid buying replacement hardware that was never going to solve the underlying issue.

By signing up I agree to receive HeatandPlumb.com emails and to the privacy policy. I can also unsubscribe at any time