0
£0.00
Painting your bathroom vanity transforms its appearance for a fraction of replacement costs, but doing it properly requires specific techniques that differ from painting ordinary furniture.
Bathrooms create challenging conditions with humidity, temperature fluctuations, and constant contact with water that destroy poorly executed paint jobs within months. Here's how to achieve results that actually last.
Not every vanity benefits from painting. Assess the underlying structure before investing time and materials into a cosmetic upgrade that might not deliver adequate returns.
Solid wood vanities are excellent painting candidates because the structure underneath justifies the refinishing effort. Quality construction lasts decades, making surface renewal sensible when you're tired of the current finish.
Laminate or melamine vanities can be painted but require extra preparation for paint adhesion. The slick non-porous surface resists paint naturally, demanding primer specifically formulated for difficult surfaces. Even with proper prep, paint on laminate is less durable than on wood.
Particleboard or MDF vanities showing water damage, swelling, or structural deterioration aren't worth painting. Surface cosmetics can't fix underlying material failure - you're just painting over problems that'll worsen regardless of how nice the new finish looks initially.
Check for solid construction, intact joints, properly functioning doors and drawers, and absence of water damage before committing to painting. If the bones are good, painting makes sense.
Gather everything before starting so you're not hunting for supplies mid-project with wet paint drying incorrectly whilst you search for missing items.
You'll need fine and medium grit sandpaper (120 and 220 grit), tack cloth for dust removal, quality primer designed for bathroom use, paint suitable for high-moisture environments, brushes and/or rollers appropriate for your chosen paint type, painter's tape for masking, screwdriver for removing hardware, and drop cloths protecting surrounding areas.
Don't economise excessively on paint quality. Bathroom-specific paints with mould inhibitors and moisture resistance cost more than standard emulsion but they're engineered for exactly these conditions. Saving £10 on paint whilst spending hours on prep and application makes no sense when the paint fails prematurely.
Water-based paints (acrylic or latex) work well for most bathroom vanities, offering easier cleanup, lower odour, and adequate durability. Oil-based paints provide superior durability and smoother finishes but require solvents for cleanup and produce strong fumes during application and curing.
Preparation determines whether your paint job lasts years or fails within months. This stage takes longer than actual painting but skipping steps creates guaranteed failure.
Remove all doors, drawers, and hardware. Painting these components separately whilst laid flat produces far better results than trying to paint them whilst attached and vertical. Label everything during removal so reassembly is straightforward - doors particularly need returning to their original positions for proper fit and alignment.
Clean every surface thoroughly with sugar soap or TSP substitute, removing grease, soap residue, hairspray, and accumulated grime. Paint doesn't adhere to dirty surfaces regardless of how good your primer is. Rinse with clean water after cleaning and let everything dry completely.
Sand all surfaces being painted using 120 grit sandpaper. You're not removing finish completely - just dulling the surface creating texture for primer to grip. Glossy surfaces must be abraded; paint slides off slick finishes regardless of primer quality.
After sanding, wipe everything down with tack cloth removing all dust particles. Dust contamination ruins paint finishes by creating rough bumpy surfaces that look amateurish and collect dirt.
Fill any dents, holes, or damage with appropriate wood filler, letting it dry completely before sanding flush with surrounding surfaces. Painted surfaces highlight imperfections rather than hiding them, so address damage before painting.
Yes, absolutely. Primer isn't optional despite what quick-fix tutorials suggest.
Primer creates the foundation that paint adheres to whilst blocking stains, evening out surface absorption, and preventing tannins or other contaminants bleeding through your finish coats. The few pounds saved skipping primer costs substantially more when you're repainting after premature failure.
Use primer specifically designed for your surface type. Wood gets wood primer. Laminate or melamine requires bonding primer formulated for non-porous surfaces. Don't use all-purpose primer assuming it'll work adequately - specialised primers exist because different surfaces need different adhesion chemistry.
Apply primer in thin even coats following manufacturer instructions. Thick primer doesn't work better - it just takes longer to dry and creates uneven surfaces. Multiple thin coats build better foundations than single thick applications.
Let primer dry completely between coats and before painting. Rushing this stage creates adhesion problems where subsequent layers don't bond properly, leading to peeling or chipping.
Thin coats applied with proper technique create better finishes than thick coats rushed on carelessly. You're building finish gradually through multiple applications rather than trying to achieve perfect coverage in one pass.
Use quality brushes for detailed areas like panel edges, door frames, and corners. Cheap brushes shed bristles that embed in wet paint creating permanent imperfections. A £10 brush lasts years with proper cleaning whilst a £2 brush ruins your first project.
Rollers work well for large flat surfaces like vanity sides and tops, creating smooth consistent finishes faster than brushing. Use appropriate nap length - smooth surfaces need short nap (5mm) whilst textured surfaces work better with longer nap.
Apply paint in long smooth strokes following wood grain direction where possible. Don't overwork the paint by repeatedly brushing the same area - this creates brush marks and uneven coverage as paint starts drying under your brush.
Allow adequate drying time between coats. Paint that feels dry to gentle touch needs additional time for full cure before handling or recoating. Follow manufacturer specifications rather than assuming faster is better.
Two to three thin coats typically provide better coverage and durability than one or two thick coats. Each layer should be barely visible individually - you're building opacity gradually rather than achieving it instantly.
Plan for at least two coats of paint over properly primed surfaces, with three coats providing optimal durability and coverage for high-use vanities.
The first coat often looks disappointing with visible brush marks, slight streaking, or incomplete coverage. This is completely normal - you're establishing base colour rather than achieving final finish.
Second coats fill in coverage gaps and begin building the smooth uniform appearance you're working toward. This coat should look substantially better than the first whilst still showing minor imperfections.
Third coats are optional for low-use vanities but recommended for bathrooms seeing daily family use. The additional layer provides meaningful durability improvement protecting your earlier work.
Don't judge results until final coats have cured completely. Wet or freshly dried paint looks different than fully cured finishes - allow at least 24-48 hours before assessing whether additional coats are needed.
Paint these components separately whilst laid horizontally to avoid drips, sags, and runs that plague vertical painting.
Support pieces on painters' pyramids or improvised stands keeping them off your work surface whilst allowing access to edges. This prevents painted surfaces adhering to newspapers or drop cloths whilst drying.
Paint panel centres first, then edges and frames. Working centre-to-edge lets you blend brush marks naturally whilst maintaining wet edges that don't show lap lines.
For panel doors with recessed centres, paint recesses first using small brushes reaching into corners, then panels, then frames. This sequence minimises awkward brushwork and produces cleaner results.
Multiple light coats work even better on doors than on the main vanity body. Thick paint applications sag on vertical surfaces creating permanent drips that require sanding and repainting to fix.
Water-based polyurethane or polycrylic top coat over fully cured paint dramatically improves durability in high-contact areas like doors, drawer fronts, and countertop edges.
The clear protective layer creates a hard surface resisting scratches, water spots, and wear from daily use. It's particularly valuable on painted vanities in family bathrooms where durability matters more than in guest bathrooms with occasional use.
Apply topcoat exactly like paint - multiple thin layers building protective finish gradually. Sand lightly between coats with 220 grit paper creating mechanical adhesion between layers.
Matte or satin sheens maintain the painted appearance whilst providing protection. Gloss topcoats look increasingly plastic and cheap, contradicting the custom painted aesthetic you've worked to achieve.
Let the topcoat cure fully before reassembling and using the vanity - this takes longer than dry time suggests. Follow manufacturer cure schedules, typically 3-7 days depending on product and environmental conditions.
When you're ready to either paint existing vanities or explore new options that don't need painting, browse our design-focused bathroom furniture options in various finishes and styles.
At Heat and Plumb, we know that painting existing vanities makes financial sense for quality furniture whilst being false economy on cheap units that aren't worth the effort. Over 20+ years, we've learned which vanities justify renovation versus which deserve replacement.
When painting isn't worth it or you'd rather invest in new, we stock vanities in finishes that won't need painting for years or decades. Plus, fee delivery across most of the UK means you can compare costs between DIY painting projects versus new vanities without shipping fees distorting the calculation.

Paint dries to touch within hours but requires days for full cure before tolerating normal use. Most bathroom paints need minimum 24-48 hours drying before gentle use, with full cure taking 5-7 days.
Yes, if the existing paint adheres well without peeling or chipping. Sand the surface creating texture for new paint to grip, clean thoroughly, prime if changing dramatically (dark to light particularly), then paint normally.
Satin or semi-gloss sheens work best for bathroom vanities, providing moisture resistance whilst being durable enough for frequent wiping and cleaning. These finishes balance durability with attractive appearance.
Use quality brushes appropriate for your paint type, apply thin coats without overworking the paint, maintain wet edges working quickly enough that adjoining areas stay workable, and consider foam rollers for large flat areas instead of brushing.
Yes, but it requires excellent primer coverage blocking the dark base colour from showing through light topcoats. Expect to use 2-3 primer coats before painting, possibly more if going from very dark to pure white.
Not necessarily if you can carefully mask the countertop edge protecting it from paint. However, removing countertops (where possible) allows painting the vanity body more thoroughly and prevents accidental paint damage to expensive stone or solid surface tops.
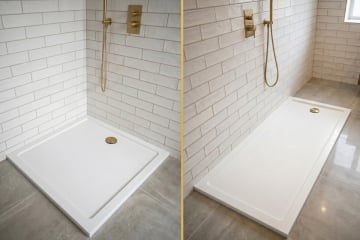
Choosing between square and rectangular shower trays affects your bathroom layout, how much floor space you're committing, and whether the shower feels cramped or comfortable during daily use.
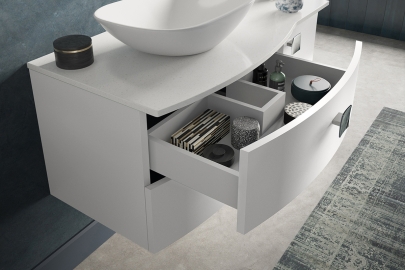
Wall-hung and floor-standing vanity units look stunning in design magazines - all that visible floor creating clean modern lines and spatial illusion. Then you actually install one and discover the reality involves serious wall strength requirements, hidden plumbing complications, and storage compromises nobody mentioned.
Creating an expensive-looking bathroom doesn't necessarily require spending a fortune - in fact, just a couple of strategic choices in specific areas can deliver a luxury appearance, all without the luxury price tag.

By signing up I agree to receive HeatandPlumb.com emails and to the privacy policy. I can also unsubscribe at any time