0
£0.00
A properly sealed shower tray is the difference between a bathroom that works and one that's quietly rotting behind the scenes. It's not complicated, but it does need doing right.
Miss a spot or use rubbish sealant and you're looking at water creeping where it shouldn't, mould blooming in corners, and potentially serious damage to whatever's underneath. Not ideal - so let's take a look at how to do it properly.
Water finds a way - that's basically its whole deal. Even the tiniest gap between your shower tray and the wall is an invitation for water to seep through. Over time, that moisture builds up behind your tiles or panels, creating the perfect environment for mould, wood rot, and all sorts of expensive problems.
A good seal keeps water exactly where it should be - in the tray, going down the drain.
Not all silicone is created equal. The cheap stuff you can grab from the pound shop will do for five minutes, but it won't be long before it goes mouldy and peels off. You want a proper bathroom-grade silicone sealant - look for ones marked as anti-fungal or mould resistant - they've got additives that stop mould growing on the surface and are definitely worth the extra couple of quid.
Some people swear by clear silicone for a subtle finish, others prefer white to match their suite. Honestly, both work fine. It's more about personal preference. We'd avoid using general-purpose or exterior sealants in your shower, as they're simply not designed for constant water exposure and likely won't last.
Here's where most people go wrong - they rush the prep.
Your surfaces need to be completely clean and dry. Any old sealant, soap scum, or moisture and your new seal won't stick properly. Use a sealant remover for old silicone, then clean everything with methylated spirits or a proper bathroom cleaner.
Make sure it's properly bone dry - if you've just had a shower, wait at least a few hours. Better yet, leave it overnight. You can also give the area a quick wipe with white spirit just before sealing, as this removes any last traces of grease or soap residue that might stop the sealant adhering.
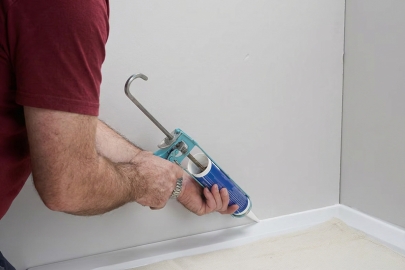
Right, time to actually seal the thing!
Cut the nozzle on your sealant tube at a 45-degree angle - about 5mm from the tip for most applications. Too big a hole and you'll have sealant everywhere; too small and it's hard to get a good bead.
Start in a corner and work your way along steadily. You want a continuous bead - no stopping and starting. Keep the gun moving at a consistent speed and angle. The trick is maintaining even pressure on the trigger. Inconsistent pressure gives you a lumpy, uneven bead that looks awful and doesn't seal properly.
Here's the trick: smooth it within about five minutes of applying. After that, it starts to skin over and you'll make a mess trying to fix it.
Wet your finger (soapy water works brilliantly) and run it along the bead in one smooth motion. Don't keep going back over it - you'll just drag the sealant around and make it look worse.If you've used masking tape, peel it off while the sealant's still wet. Wait until it's dry and you'll pull the seal off with the tape. Not great.
Pro Tip: The angle matters when you're smoothing. You want to push the sealant into the gap, not just flatten it across the surface. A slight diagonal motion works better than going straight along.
This is where patience comes in; most silicone sealants need 24 hours to cure fully, some need longer. Don't use the shower during this time. No quick rinses, no "just five minutes won't hurt." Let it do its thing. Water hitting uncured sealant can cause it to cure unevenly or not bond properly.
The room also needs decent ventilation while the sealant cures. Open a window or leave the door ajar. The sealant releases acetic acid as it cures (that vinegar smell), and good airflow helps this process along.
Even good sealant doesn't last forever, so you're probably looking at replacing it every two to three years, depending on how much use your shower gets. And like with anything in the bathroom, you'll want to keep an eye out for mould growth, peeling, or gaps forming, which would indicate it's time for a refresh. Regular cleaning does help - just use standard bathroom cleaner, nothing too abrasive.
If you spot mould starting to grow on the surface, you can often clean it off with a bleach solution. But if it keeps coming back, the sealant's probably past its best.
Pro Tip: Don't use harsh chemicals or abrasive cleaners on silicone. They break down the seal faster. Stick to mild bathroom cleaners and a soft cloth.
Another mistake is sealing over damp surfaces - the sealant might look fine initially, but it won't have bonded properly and will fail within weeks.
If you're dealing with a leak that's already causing damage, or if you're just not confident about getting a watertight seal, there's no shame in getting a professional involved.
Plumbers and bathroom fitters do this stuff constantly. They'll get it done quickly and properly, which might save you hassle in the long run.
If you've tried sealing multiple times and keep getting failures, there might be an underlying issue - movement in the tray, poor surface preparation, or moisture problems that need addressing first.
When you're looking for stylish choices for improving shower functionality, we stock over 30,000 products including everything you need for a complete bathroom installation - not just the big items, but all the finishing touches and sealants too.
We've been online for around 20 years, and in that time we've built up extensive technical knowledge across all our product ranges. Plus, we know our stuff; our staff understand how everything fits together and can advise on compatibility and installation.
Free delivery to most of the UK means you don't need to factor in extra costs when budgeting your project. And if you're unsure about any aspect of your shower installation, our technical sales team can talk you through it properly.

Good quality bathroom sealant typically lasts 2-3 years with regular use. It depends on how often the shower's used, how well it was applied, and the quality of the sealant itself. Check it regularly for signs of mould, peeling, or gaps, and reseal when needed rather than waiting for it to fail completely.
No, you shouldn't seal over old sealant. The new sealant won't bond properly to the old stuff, and you'll end up with a poor seal that fails quickly. Always remove all the old sealant completely, clean the surfaces thoroughly, and start fresh. It's more work but it's the only way to get a proper seal.
Look for a bathroom-grade silicone sealant specifically marked as anti-fungal or mould resistant. Brands like UniBond, Everbuild, and CT1 make good bathroom sealants. Avoid general-purpose or exterior sealants - they're not designed for constant water exposure. Spending an extra couple of pounds on quality sealant is worth it.
Use a sharp craft knife or sealant removal tool to cut and peel away as much as possible. Then apply a chemical sealant remover (available from DIY shops) to dissolve any residue. Clean thoroughly with methylated spirits afterwards. Make sure everything's completely dry before applying new sealant.
Cheap sealant without anti-fungal additives goes mouldy quickly in damp bathroom conditions. Poor ventilation makes it worse - if your bathroom stays damp all the time, mould grows faster. Using proper bathroom-grade sealant and ensuring good ventilation helps. If mould keeps returning on good quality sealant, it might indicate a ventilation or moisture problem.
It's mostly personal preference. White sealant tends to match white bathroom suites and shows less discolouration over time. Clear sealant is more subtle and works well with coloured suites or tiles. Both work equally well for sealing - just make sure whichever you choose is proper bathroom-grade silicone.
A weak shower is often caused by a mismatched shower head, built-up limescale, restrictive pipework, a poorly specified water system or an incompatible pump. Pinpointing the root of the problem saves money and helps avoid buying replacement hardware that was never going to solve the underlying issue.
Replacing a bath without disturbing the existing tiles is sometimes possible, but only if the new bath suits the existing footprint, tile line and plumbing setup. If the fit is wrong, you can be left with damaged wall surfaces, awkward gaps or a seal that is difficult to make reliable.
Hard water regions across the UK leave dense calcium carbonate deposits that block shower head nozzles and severely restrict water flow. Removing this limescale safely relies on mild acidity, rather than the aggressive scrubbing or heavy chemicals that permanently ruin bathroom fittings.

By signing up I agree to receive HeatandPlumb.com emails and to the privacy policy. I can also unsubscribe at any time