0
£0.00
Shower trays get absolutely filthy, don't they? Soap scum, limescale, hair, random grime - it all accumulates faster than you'd think, especially in hard water areas.
Regular cleaning keeps your shower tray looking decent and prevents permanent staining or damage that'll ruin it long before its time. Here's how to tackle it properly.
Leaving your shower tray dirty isn't just about aesthetics, though a grimy shower is pretty grim to stand in every morning. Soap residue and limescale build up into stubborn deposits that become progressively harder to remove the longer you leave them.
Hard water stains can actually etch into certain tray materials permanently if left untreated for months. What starts as surface discolouration becomes permanent damage that won't budge no matter how hard you scrub, particularly on acrylic and resin trays.
Mould and mildew thrive in damp environments with organic matter present, which describes your shower tray perfectly. Once they establish themselves in sealant joints or textured surfaces, they're genuinely difficult to eliminate completely.
Not all shower trays tolerate the same cleaning products, and using the wrong stuff can cause permanent damage that voids warranties.
Acrylic trays are lightweight and affordable but scratch easily with abrasive cleaners or scouring pads. They need gentle treatment with non-abrasive products and soft cloths to avoid dulling the surface or creating scratches that trap dirt.
Stone resin trays are tougher and more resistant to scratching, but they can stain if you leave acidic substances sitting on them for extended periods. They handle most standard bathroom cleaners well but don't love harsh chemicals.
Ceramic trays are the hardiest and cope with pretty much anything, though the grout and sealant around them still need careful treatment to avoid damage or discolouration.
A quick rinse after each shower prevents most buildup before it becomes a problem requiring serious scrubbing effort.
Just spray down the tray with the showerhead, washing away soap residue, hair, and loose dirt whilst they're still fresh and easy to shift. Takes literally thirty seconds and makes your weekly deep clean substantially easier.
Squeegee the tray if you're already doing the glass doors or walls. Getting standing water off the surface prevents limescale deposits forming and reduces the damp conditions that encourage mould growth.
Leave the bathroom door or window open after showering to allow moisture to escape and the tray to dry properly. Constant dampness creates perfect conditions for mould and mildew that no amount of cleaning will prevent if the environment stays perpetually wet.
Once a week, give your shower tray a proper clean rather than just a rinse, which keeps everything properly maintained without becoming a massive chore.
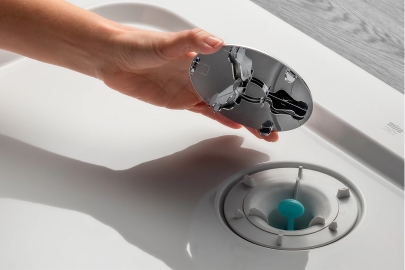
Start by removing any bottles, bath toys, or other items from the tray so you can access the entire surface. Check the drain cover and remove any hair or debris that's accumulated - this stuff restricts drainage and harbours bacteria. Then, spray the entire tray with bathroom cleaner appropriate for your tray material. Let it sit for 5-10 minutes so the chemicals can break down soap scum and limescale rather than just scrubbing against stubborn deposits.
Use a non-abrasive sponge or soft cloth to wipe down the entire surface, paying extra attention to corners and around the drain where grime accumulates most. For textured anti-slip surfaces, a soft brush helps get into the grooves without damaging the finish.
Rinse thoroughly with clean water, making sure no cleaner residue remains. Leftover cleaning products leave a film that actually attracts dirt faster and can make the surface slippery.
Hard water areas struggle constantly with limescale buildup that regular cleaning doesn't always shift completely.
White vinegar works brilliantly for dissolving limescale naturally without harsh chemicals. Spray it on affected areas, leave it for 15-20 minutes, then scrub gently and rinse. For really stubborn deposits, soak paper towels in vinegar and lay them over the limescale for an hour before scrubbing.
Commercial limescale removers are stronger and faster but check they're safe for your specific tray material first. Some are too acidic for certain surfaces and can cause permanent etching or discolouration.
Never use wire wool or harsh abrasive pads even on stubborn limescale, especially on acrylic trays. You'll scratch the surface, creating permanent damage that looks worse than the limescale and provides more places for dirt to accumulate.
Black spots around sealant joints or in textured surfaces are mould and mildew that need proper treatment to eliminate them effectively.
Bathroom mould remover sprays containing bleach work well for killing mould on most surfaces. Spray generously on affected areas, leave for the recommended time (usually 10-15 minutes), then scrub with an old toothbrush to get into sealant joints and textured areas.
For persistent mould that keeps returning, the problem might be inadequate ventilation rather than insufficient cleaning. Improve airflow with better extraction or by leaving windows open after showers.
If mould has penetrated deep into deteriorating sealant, no amount of cleaning will fix it permanently. You'll need to remove and replace the sealant completely to eliminate the mould and prevent it returning.
Certain cleaning approaches damage shower trays permanently, even though they might seem effective initially.
Never use undiluted bleach on acrylic or coloured trays - it can cause permanent discolouration and surface damage. Always dilute it substantially if you're using it at all, and test it somewhere inconspicuous first.
Avoid abrasive cream cleaners or scouring powders that scratch the surface. These might shift stubborn stains initially but create microscratches that trap dirt and make future cleaning harder whilst dulling the finish.
Don't mix different cleaning products together, particularly bleach and acidic cleaners like vinegar. This creates toxic fumes that are genuinely dangerous and can cause serious respiratory problems.
Steam cleaners aren't ideal for acrylic trays as the intense heat can potentially warp or damage the material, particularly on cheaper units that aren't designed to handle high temperatures.
Prevention is substantially easier than removing established stains, and a few simple habits make a massive difference.
Rinse away brightly coloured products like hair dye, fake tan, or vibrant shower gels immediately rather than letting them sit on the tray. These can stain certain materials permanently if left for hours.
Use a drain protector to catch hair before it clogs the drain and creates standing water that stains and harbours bacteria. They cost a couple of quid and prevent numerous problems.
Fix dripping taps promptly as constant dripping in one spot creates persistent limescale buildup and rust stains that become increasingly difficult to remove over time.
The sealant around your shower tray needs maintenance too, not just the tray itself, as deteriorating sealant causes leaks and mould problems.
Clean sealant joints regularly with a soft brush and bathroom cleaner to prevent mould establishing itself in the silicone. Once mould penetrates deeply into sealant, surface cleaning won't eliminate it.
Check sealant condition periodically for cracks, peeling, or gaps that indicate it needs replacing. Failed sealant lets water penetrate behind the tray, causing serious damage and expensive repairs.
When sealant deteriorates beyond cleaning, remove it completely and apply fresh silicone following proper application techniques. Our guide on bathroom cleaning tips covers broader bathroom maintenance including sealant care.
Sometimes cleaning isn't enough because the tray itself has deteriorated beyond what maintenance can address.
Permanent stains that won't respond to any cleaning products indicate the tray material has been damaged or discoloured irreversibly. Continuing to scrub won't help and might make things worse.
Cracks or chips that have penetrated the surface layer can't be properly repaired and will only worsen with time, eventually leading to leaks and structural failure.
Persistent mould that returns within days of thorough cleaning suggests the tray material has degraded and become porous, providing perfect conditions for mould growth that cleaning alone can't overcome.
If you're facing replacement, have a look at our options for upgrading your current shower space to see what modern trays offer in terms of easier maintenance and better durability.
At Heat and Plumb, we know that keeping bathroom fixtures clean is easier when you start with quality products designed for longevity. We stock over 30,000 bathroom items including shower trays in materials chosen specifically for durability and ease of maintenance rather than just initial appearance.
Free delivery to most of the UK means you're not adding extra costs when you need replacement trays or cleaning supplies for ongoing maintenance. Twenty years online has taught us which products actually last and which ones deteriorate quickly despite looking identical initially.
Our staff understand the practical side of bathroom ownership, not just the glamorous renovation aspects. If you're struggling with persistent cleaning problems or considering replacement, we can discuss whether the issue is maintenance technique or whether your tray has genuinely reached the end of its useful life.

Weekly deep cleaning keeps most shower trays in good condition without becoming an overwhelming chore. Daily quick rinses after use reduce buildup significantly, meaning your weekly clean takes less time and effort. In hard water areas or with heavy usage, you might need to clean more frequently - perhaps twice weekly - to prevent limescale and soap scum accumulating to stubborn levels.
Diluted bleach works safely on white ceramic and some stone resin trays for removing mould and stains. Never use undiluted bleach or bleach on acrylic trays as it can cause permanent discolouration and surface damage. Always check your tray manufacturer's care instructions first, test in an inconspicuous area, and ensure good ventilation when using bleach products.
Persistent stains usually indicate the tray material has been permanently damaged or discoloured rather than just dirty. Hard water stains can etch into acrylic and resin surfaces if left untreated for extended periods. Some substances like hair dye, certain medications, or fake tan can permanently stain lighter-coloured trays. If proper cleaning with appropriate products doesn't remove stains, they're likely permanent.
Act immediately when hair dye contacts your shower tray - rinse it away before it has time to set. For fresh stains, bathroom cleaner or diluted bleach (on suitable materials) often works. Established hair dye stains are extremely difficult to remove and may be permanent, particularly on acrylic and lighter-coloured materials. This is why prevention through immediate rinsing matters so much.
Textured surfaces require a soft brush rather than just a cloth to get into the grooves where dirt accumulates. Use gentle circular motions with bathroom cleaner and a soft-bristled brush, being careful not to scrub too aggressively and damage the texture. Rinse thoroughly as cleaning products can get trapped in textured patterns. Never use abrasive cleaners that'll wear down the anti-slip texture over time.
Steam cleaners aren't recommended for acrylic trays as the intense heat can potentially warp or damage the material. Stone resin and ceramic trays generally tolerate steam cleaning better, but always check manufacturer guidelines first. For most shower trays, conventional cleaning methods with appropriate products work perfectly well without risking heat damage.
A weak shower is often caused by a mismatched shower head, built-up limescale, restrictive pipework, a poorly specified water system or an incompatible pump. Pinpointing the root of the problem saves money and helps avoid buying replacement hardware that was never going to solve the underlying issue.
Replacing a bath without disturbing the existing tiles is sometimes possible, but only if the new bath suits the existing footprint, tile line and plumbing setup. If the fit is wrong, you can be left with damaged wall surfaces, awkward gaps or a seal that is difficult to make reliable.
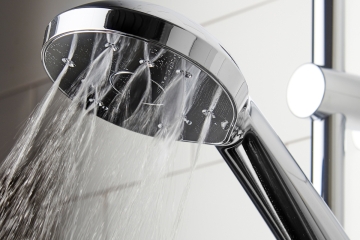
Hard water regions across the UK leave dense calcium carbonate deposits that block shower head nozzles and severely restrict water flow. Removing this limescale safely relies on mild acidity, rather than the aggressive scrubbing or heavy chemicals that permanently ruin bathroom fittings.

By signing up I agree to receive HeatandPlumb.com emails and to the privacy policy. I can also unsubscribe at any time