0
£0.00
Removing a shower tray sounds straightforward until you actually attempt it and realise there's considerably more involved than just pulling the old tray out.
Whether you're replacing a damaged tray, upgrading to something better, or doing a full bathroom renovation, knowing how to remove it properly prevents damage to your floor, walls, and plumbing. Here's the process.
There are several legitimate reasons you'd tackle this job rather than just working around the existing tray.
Cracks or damage that allow water to leak through mean the tray needs replacing before it causes serious floor damage underneath. Small cracks only get worse with time and the constant water exposure, so removal and replacement becomes inevitable.
Persistent mould or staining that won't respond to cleaning indicates the tray material has degraded beyond what surface maintenance can address. Once a tray becomes porous and harbours mould internally, replacement is the only proper solution.
Renovation projects often require removing the existing tray to install different sizes, change the shower layout, or upgrade to better quality materials that'll last longer and look more appealing.
Gather your tools before starting so you're not hunting around mid-job with water pipes exposed and your bathroom unusable.
You'll want an adjustable spanner or pipe wrench for disconnecting plumbing, utility knife for cutting sealant, pry bar or crowbar for lifting the tray, hammer for persuading stubborn fixtures, screwdriver set for various fixings, and safety gear including gloves and safety glasses.
Have a bucket ready for water that'll drain from pipes when you disconnect them, and plenty of old towels for mopping up spills. A torch helps you see into dark corners under the tray where pipework hides.
If you're dealing with a tiled-in tray, you'll also need a tile cutter, chisel, and club hammer for removing tiles around the perimeter.
This seems obvious but people genuinely forget and create unnecessary flooding when they disconnect pipes with water still flowing.
Locate your stopcock (usually under the kitchen sink or in a downstairs cupboard) and turn it clockwise to shut off the mains water supply. Open a tap downstairs to release pressure and confirm the water's actually off.
If your shower has its own isolation valves, you might only need to close those rather than shutting off the entire house supply. Check carefully before assuming though - isolation valves sometimes don't fully seal when they're old.
Turn off any electric shower units at the mains consumer unit, not just at the pull-cord switch. Working near electricity and water simultaneously is unnecessarily dangerous.
The sealant around the tray's edges bonds it to the walls and prevents water escaping, but it also holds the tray firmly in place.
Run a sharp utility knife along all sealant joints where the tray meets the walls, cutting through the silicone completely. This takes more pressure than you'd expect as aged sealant becomes quite tough and resistant.
If there's quadrant trim or beading around the edges, carefully pry it off with a flat screwdriver or old chisel. These pieces often crack when removed, so don't plan on reusing them even if they look intact.
For tiled-in trays where tiles overlap the tray edge, you'll need to remove at least the bottom row of tiles around the perimeter. Use a grout rake to remove grout, then carefully chisel tiles off the wall, working slowly to minimise wall damage.
The waste trap underneath connects your tray to the drainage system and needs disconnecting before the tray can move.
Access underneath the tray if possible - some installations have access panels in adjacent rooms or cupboards. If there's no access, you'll need to work from above, which is considerably more awkward.
Place your bucket underneath the waste trap to catch water that's sitting in the trap bend. Unscrew the trap from the tray waste using your adjustable spanner, turning anticlockwise. Water will pour out as you loosen it, so be ready.
Once the trap's disconnected, you might be able to pull the entire waste assembly up through the tray if it's not sealed in place. Some installations have the waste permanently bonded to the tray and will come out together.
How your tray is secured depends on the type and installation method, and you need to release all fixing points before attempting to lift it.
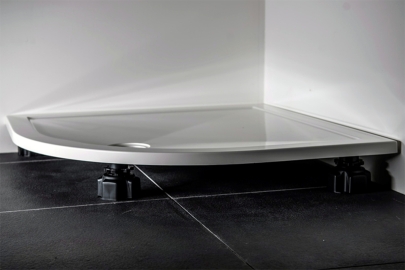
Acrylic trays on adjustable legs have legs screwed into the tray underside. If you can access underneath, unscrew or collapse these legs. If there's no access, you'll need to break the legs or cut them off, accepting they're sacrificial.
Stone resin trays bedded on mortar are essentially glued down to the floor. You'll need to break the mortar bond by working a pry bar under the edges and gradually levering upward, which often cracks cheaper trays but is unavoidable.
Some trays have metal frames or brackets screwed to walls or floor joists. Look carefully for any fixings and remove them before attempting to lift the tray, otherwise you'll damage walls or the tray itself trying to force it.
With everything disconnected and unsealed, you can finally remove the tray itself, though this often proves trickier than expected.
Slide a pry bar or crowbar under one edge and lever gently upward to break any remaining adhesive bonds. Work your way around the perimeter rather than forcing one corner, which risks cracking the tray or damaging the floor underneath.
Acrylic trays are relatively light and one person can usually manoeuvre them out through the bathroom door. Stone resin trays are surprisingly heavy - a standard 900mm tray weighs 20-30kg, larger ones considerably more. Get help for these rather than risking back injury or dropping them.
If the tray absolutely won't budge despite disconnecting everything visible, there's probably a hidden fixing point you've missed. Stop and investigate rather than forcing it and causing damage.
Once the tray's out, assess the floor condition before installing anything new, as this is your only opportunity to address underlying problems.
Check for water damage, rot in wooden floors, or deteriorating screed on concrete. Any damp or damaged areas need sorting before a new tray goes in, otherwise you're just covering up problems that'll worsen.
The floor needs to be level for your new tray to drain properly and sit stable. Use a spirit level to check, and apply self-levelling compound if needed to correct any significant slopes or dips.
Clean away all old adhesive, mortar, sealant, and debris so you're working with a clean surface. Old adhesive prevents new sealant bonding properly and creates weak points where water can penetrate.
Different tray constructions require slightly different removal approaches based on how they're installed.
Glued-down trays bonded with adhesive or mortar need aggressive prying and often crack during removal. Focus on getting them out without damaging the floor rather than preserving the old tray, which is basically worthless once you've decided to replace it.
Trays on adjustable leg systems lift out relatively easily once you've collapsed or removed the legs and disconnected the waste. The legs sometimes corrode and seize though, requiring cutting or breaking.
Shower pods or cubicles with integrated trays often need complete disassembly of the entire enclosure before the tray section can come out. These are genuinely awkward and usually require two people working systematically.
Some removal situations exceed reasonable DIY scope and warrant getting someone experienced involved rather than struggling and potentially causing expensive damage.
Shower trays installed directly on floor joists without proper support need extremely careful removal to avoid damaging structural timbers. If you're uncertain about what's supporting your tray, get professional advice.
Electric showers with complex wiring should have the electrical work handled by a qualified electrician even if you're comfortable with the plumbing and tray removal aspects.
Heavily tiled installations where removing the tray requires dismantling half your bathroom wall often cost more in time and potential damage than just paying someone who does this regularly and has the right tools.
You can't just chuck an old shower tray in your wheelie bin as they're too large for standard household waste collection.
Most local recycling centres accept shower trays in their general waste or construction waste skips. Check your local centre's rules first as some require booking for bulky items.
If you're having a skip delivered for a larger renovation project, the old tray goes in there along with everything else. For just a tray removal, hiring an entire skip is overkill.
Some waste removal companies offer single-item collection services that might cost £30-50, which can be worth it to avoid the hassle of transporting a bulky tray yourself.
If you're upgrading, have a look at our durable trays ideal for modern bathrooms - discover what's available in terms of materials and designs that'll last properly.
At Heat and Plumb, we've seen every possible shower tray installation scenario over our 20+ years online, and we know that removal is often harder than installation. When you're ready to replace that old tray, we stock over 30,000 bathroom products including modern shower trays designed for easier installation and longer lifespan than older designs.
Free delivery to most of the UK matters when you're ordering bulky items like shower trays that many suppliers charge substantial transport fees for. We've built relationships with quality manufacturers who make trays that'll actually last rather than needing replacement in five years.
Our staff understand the practical realities of bathroom renovation, not just the glossy catalogue pictures. If you're planning a replacement and want advice on what'll work with your specific floor construction or bathroom layout, we can discuss the options properly rather than just selling you whatever's most profitable.

Quality shower trays don't need replacement on a set schedule - they last until they develop problems that maintenance can't address. Acrylic trays typically last 10-15 years with proper care, whilst stone resin trays often exceed 20 years before showing significant wear. Ceramic trays can last 30+ years if they don't crack.
Technically possible if you're moving it to a different location, but rarely worth the effort unless it's an expensive stone or premium material tray in excellent condition. The removal process often damages trays, particularly acrylic ones that crack easily under stress.
Some installations have absolutely no access to pipework underneath the tray, which makes disconnecting the waste trap from below impossible. You'll need to work from above, unscrewing the visible waste cover on the tray surface.
If you're replacing a lightweight acrylic tray with a much heavier stone resin model, floor support becomes a legitimate concern, particularly on upper floors or with older properties.
Definitely replace the waste trap and visible pipework since you're accessing it anyway and these components deteriorate over time. Modern fast-flow waste kits perform better than older designs and reduce the chance of standing water causing issues.
Not checking what's supporting the tray before attempting removal. People assume there's solid floor underneath and discover too late that the tray was sitting on a mortar bed over joists with no proper support structure.

Learn how to measure for a bath screen, including width, height, swing space, bath shape, tap position and the key checks before buying.
When a customer tells me their radiator is hot at the top but freezing at the bottom, the diagnosis is usually straightforward: the hot water isn't circulating through the lower channels. In the vast majority of UK central heating systems, this points to a build-up of debris restricting the flow where it naturally settles. Let's look at exactly what is going on and how to sort it out before you spend money on a replacement.

A weak shower is often caused by a mismatched shower head, built-up limescale, restrictive pipework, a poorly specified water system or an incompatible pump. Pinpointing the root of the problem saves money and helps avoid buying replacement hardware that was never going to solve the underlying issue.

By signing up I agree to receive HeatandPlumb.com emails and to the privacy policy. I can also unsubscribe at any time