0
£0.00
Installing a shower enclosure looks deceptively simple when professionals do it, but getting everything level, sealed, and functioning properly requires careful attention to detail throughout the process.
Rushing or skipping steps creates leaks, wonky doors, and frustration that lasts for years. Here's how to approach the installation methodically for results you'll be happy with long-term.
Gather everything before starting so you're not hunting for tools mid-installation with partially assembled glass panels waiting. You'll need a spirit level (essential, not optional), drill with masonry and tile bits, silicone sealant and gun, adjustable spanner, pencil for marking, tape measure, and protective gloves for handling glass safely.
The enclosure packaging should include all mounting brackets, screws, wall plugs, and seals required for installation. Check everything's present before starting - discovering missing components halfway through installation is genuinely frustrating.
Have plenty of old towels ready for protecting surfaces and mopping up water from testing. A bucket catches water when you're testing for leaks before sealing everything permanently.
Safety glasses protect your eyes when drilling tiles or masonry. Glass panels have sharp edges despite being toughened, so handle them carefully throughout to avoid cuts.
The tray must be completely installed, level, and sealed before fitting the enclosure. Don't attempt to install both simultaneously - the tray provides the foundation everything else builds upon.
Check the tray is absolutely level in all directions using your spirit level. Even slight deviations affect how well the enclosure fits and seals, potentially creating gaps that leak. If the tray isn't level, address that before proceeding with enclosure installation.
Clean the tray edges thoroughly where the enclosure will seal, removing any dust, debris, or old sealant residue. The seal between enclosure and tray is critical for preventing leaks, so prepare surfaces properly.
Mark the tray edge positions where wall channels will sit, using the enclosure instructions as guides. Accurate marking now prevents misalignment later when you're trying to hold heavy glass panels whilst positioning brackets.
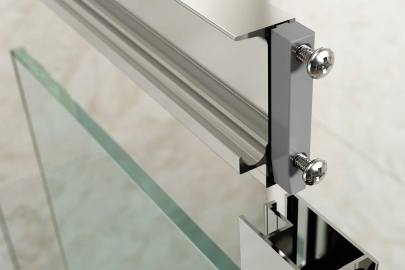
Wall channels provide the framework that glass panels attach to, so positioning them accurately is absolutely crucial for proper enclosure function and appearance.
Hold the wall channel against the wall at the marked position, checking it's perfectly vertical with your spirit level. Mark through the mounting holes onto tiles or wall surface with your pencil, creating drilling guides.
Drill pilot holes at marked positions using appropriate bit for your wall type - masonry bit for tiles over brick, careful tile drilling to avoid cracking. Drill slightly deeper than screw length to ensure adequate grip.
Insert wall plugs into drilled holes, tapping them flush with the wall surface. Mount the channel using supplied screws, checking it remains vertical throughout tightening. Don't fully tighten until you've verified alignment with other components.
Apply silicone sealant to the back of the channel before final positioning if instructed by the manufacturer. This creates a waterproof seal preventing water penetrating behind the channel where it'll cause hidden damage over time.
Glass panels are heavy and awkward to handle alone - get assistance for this stage unless you're experienced and confident managing large glass sheets safely.
Slide the main fixed panel into the wall channel from above, lowering it carefully whilst ensuring it seats properly in the bottom channel or directly onto the tray edge. The panel should sit vertically without forcing or binding.
Check the panel is perfectly vertical using your spirit level on multiple edges. Adjust the wall channel position slightly if needed to achieve true vertical before tightening fixings completely.
Secure the panel using the brackets or clamps provided, following manufacturer instructions precisely. These components are engineered specifically for the enclosure and substituting or repositioning them creates problems.
Door installation varies significantly between enclosure types - sliding, pivot, hinged, or bifold mechanisms all have different processes detailed in your specific enclosure instructions.
For sliding doors, install the track system first, ensuring it's level and securely mounted. The door panels then slot into tracks from above, with rollers or guides at top and bottom controlling movement.
Hinged or pivot doors require precise hinge positioning so the door swings freely without binding whilst still sealing properly when closed. The magnetic strips or seals that create the watertight closure need careful alignment.
Adjust door alignment using the adjustment mechanisms built into most modern enclosures. Small tweaks to roller height, hinge position, or magnetic strip placement ensure smooth operation and proper sealing.
Sealing is where many DIY installations fail, creating leaks that only become apparent after several uses when water has found its way through inadequate sealing.
Run continuous beads of bathroom-grade silicone sealant along all joints where the enclosure meets walls and tray. Don't leave gaps or breaks in the sealant line - water finds the tiniest openings.
Smooth the sealant immediately after application using a wet finger or proper smoothing tool, creating neat joints that bond properly to both surfaces. Waiting too long allows the sealant to skin over, making smoothing impossible and leaving rough irregular beads.
Let the sealant cure completely before using the shower - typically 24 hours minimum though check your specific product instructions. Using the shower whilst sealant is still curing prevents proper bonding and creates leaks.
Testing before the sealant fully cures reveals problems whilst you can still fix them easily rather than discovering leaks weeks later when sealant has set completely.
Run water over all joints and seals, particularly around the door and where panels meet walls. Watch carefully for any water escaping onto bathroom floors or seeping through joints.
Check inside any boxed channels or hollow sections for water accumulation that indicates seals aren't working properly. Water collecting where it shouldn't signals future problems requiring attention.
Small leaks often appear at door closures where magnetic strips or seals don't quite meet properly. Adjust door position or replace seals if water escapes despite the door being closed firmly.
Not checking the tray is level before starting leads to wonky enclosures that never quite sit right and develop gaps that leak despite proper sealing technique.
Over-tightening fixings cracks tiles or damages wall channels, whilst under-tightening allows movement that breaks seals over time. Tighten firmly but not excessively - you're securing components, not trying to crush them.
Skipping the silicone behind wall channels creates pathways for water to penetrate behind the enclosure where it causes hidden damage to walls and floors. This silicone might seem optional but it's genuinely important.
Using general-purpose silicone instead of bathroom-grade sealant results in mould growth and seal failure within months. The few pounds saved on cheaper sealant costs substantially more in repairs when seals fail prematurely.
Once everything is installed and sealed, make final adjustments to ensure smooth operation and proper sealing before considering the job complete.
Check doors open and close smoothly without binding or requiring excessive force. Adjust rollers, hinges, or alignment as needed for effortless operation - properly installed enclosures shouldn't need wrestling with.
Verify magnetic strips align properly when doors close, creating firm contact that seals the opening. Misaligned magnets allow water escape even when the door appears closed.
Clean off any fingerprints, sealant smears, or installation marks from glass panels and chrome fixtures. First impressions of your newly installed enclosure matter, and thorough cleaning shows proper attention to detail.
At Heat and Plumb, we've seen every installation mistake possible over 20+ years, which means we stock enclosures designed for realistic DIY installation rather than only professional-grade products. Our range includes models with clear instructions and forgiving adjustment systems that help first-time installers achieve good results, whether you're after space-saving shower cubicle alternatives or high quality traditional enclosures.
Free delivery across most of the UK means you're not paying extra transport on bulky enclosure packages. We've selected suppliers who provide comprehensive installation instructions rather than vague diagrams that leave you guessing.
What sets us apart is being available for installation questions when you're mid-project and confused. We'd rather talk you through a tricky step than have you bodge it and need to buy replacement components. Sometimes the best customer service is preventing problems rather than just processing returns.

Experienced DIY installers typically complete enclosure installation in 3-5 hours for straightforward designs, though complex configurations or first-time installations can take a full day. Factor in time for sealant curing before use - you can't rush this stage. Professional installers work faster, often completing standard enclosures in 2-3 hours, though they're still limited by sealant curing times before the shower becomes usable.
Technically possible but genuinely difficult due to glass panel weight and awkwardness. Most enclosures are designed assuming two-person installation, with instructions reflecting this. Having assistance makes the job substantially easier, safer, and more likely to result in proper alignment. The extra pair of hands is worth arranging even if it delays installation slightly.
Most enclosures include adjustment mechanisms specifically to accommodate slightly uneven walls - typically 10-15mm of adjustment in wall channels allows compensation for irregularities. Severely uneven walls (20mm+ variation) cause significant problems that adjustment mechanisms can't fully address. You might need to pack out channels or accept some gaps that require careful sealing.
Yes, complete all tiling before enclosure installation. The enclosure seals to finished tile surfaces, and attempting to tile around an installed enclosure is extremely difficult and risks damage. Leave a small gap (2-3mm) between tiles and tray edge for the enclosure to sit into. Don't tile right to the tray edge or the enclosure won't fit properly.
Technically possible if you're moving it to a new tray of identical size, but realistically the sealant damage during removal often makes reuse impractical. Wall channel fixings might not align with new positions, and glass can crack during dismantling. New enclosures aren't prohibitively expensive, and the certainty of proper fit and undamaged components usually justifies buying new rather than risking old components.
Check the door is hanging vertically using a spirit level - misaligned doors won't close or seal properly. Adjust hinges or rollers to correct vertical alignment. Verify nothing obstructs the door's travel path and magnetic strips align when the door is closed. Small adjustments to strip position or door alignment usually resolve closure problems.

Learn how to measure for a bath screen, including width, height, swing space, bath shape, tap position and the key checks before buying.
When a customer tells me their radiator is hot at the top but freezing at the bottom, the diagnosis is usually straightforward: the hot water isn't circulating through the lower channels. In the vast majority of UK central heating systems, this points to a build-up of debris restricting the flow where it naturally settles. Let's look at exactly what is going on and how to sort it out before you spend money on a replacement.

A weak shower is often caused by a mismatched shower head, built-up limescale, restrictive pipework, a poorly specified water system or an incompatible pump. Pinpointing the root of the problem saves money and helps avoid buying replacement hardware that was never going to solve the underlying issue.

By signing up I agree to receive HeatandPlumb.com emails and to the privacy policy. I can also unsubscribe at any time